Saturday, December 17, 2016

Shibori and endless ways of tie and dye

Last few days has been very exciting for me and I feel happy to end this year this way.  I have learnt two new arts on clothes
Batik art
Tie and dye, Shibori

Tie and dye is what is locally known as the Bandani. I think every lady once in her life time would have bandani sari or dress in her wardrobe. What I learnt was various forms of tying a fabric and later dyeing it in dye solution. While learning to do this our instructor also taught us the art of Shibori.

Shibori is a Japanese dyeing technique where we fold,twist the cloth using a binding material such as thread, wood, rubber bands etc., and then dyeing it in indigo. Whatever is used to bind the fabric will resist the dye, resulting in patterns in the original color and areas of cloth where there was no binding would turn to indigo(dye color). Shibori is a very vast technique and there are tons of ways to do it and hence  you can create infinite number of patterns. While Shibori technique is mostly limited to indigo solution our own tie and dye techniques involves various varieties of Shibori but with different colored dye solution.

For the dye preparation, we used the direct colors available in the market. These are good for beginners but slight disadvantage colors might leak in the first few washes. Also the final color is slightly dull than what is expected.
To prepare the dye solution, weigh your cloth first(Say X grams).  Add
4% of X dye color,
4% of X Sodium Bicarbonate/Carbonate
4% of X soft soap like lifebuoy, grated
4% of X crystal salt.
All of these boiled together and you dip your cloth in it and let it stay for 20 to 25 minutes. Keep rotating the cloth frequently for uniform dyeing. Dry it in sun without untying. Once it has dried untie, wash it to remove the remains of soap.

And I will tell you it's really a magic created on clothes

Here is some sample which I did myself..

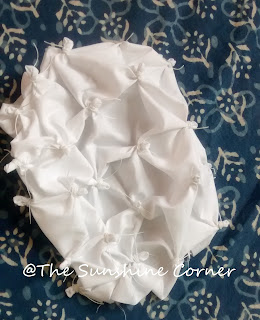
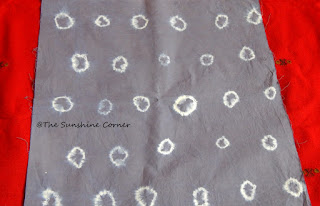
This I did drawing equidistant circles on a white cloth and later pinching these circles and tying it with thread.

After dyeing in Royal Blue dye solution I got this :


Second one was folding the cloth in a triangular shape and tying the ends with a thick thread and after dyeing it, and untying I got this. 


The third one was again folding the cloth in the triangular shape and tying the whole thing like a banana tightly with the thread.


And I got this!!

All of the above were white cloth of size 17 by 17 inch square with an intention of doing cushion covers. But unfortunately the color after drying turned out to be dull lavender so I am shelving the idea of cushion covers. Apart from this we also tried our hands on creating a dress material using Shibori. I am yet to finish it, and let you know the results soon. 
Till then, enjoy your last days of the year..


Monday, November 28, 2016

DIY: How to paint the terracotta

I had bought few plain terracotta lamps, lantern few months back and thought to make it fancy for this Deepavali festival. Due to overtime on the Internet and thousand other things I could not complete them in time. Hopefully they are ready for the next year.

I wanted something similar to the ones that we get in the shops like ExclusiveLane,  Jute cottage .The normal acrylic that we use from brands like Camlin, Fevycril etc., were not giving me the desired results. These paints apparently give a glossy look to the finished product.

Terracotta Diyas

There was an exhibition during Deepavali near my residence. The painted terracotta hanging bells were cute and I bought one for home. Soon as I showed it to my family, their unanimous reaction was that why did I buy it since I could color them myself. But there was a selfish reason behind it, I wanted to know the type of paint she used. But to my disappointment the she didn't part with her trade secret.
This incident made me more determined to find the paint. And to some extent I found it I think. I used the left over Asian Paint premium emulsion paint( Matt finish) from our painting. The results exactly matches what I had in my mind.

How to paint

For the terracotta lamps, soak them overnight in a tub/bucket of water. Next day take a old unused tooth brush and brush off any dust/mud in the corners or holes. Let it dry thoroughly in the sun light.
Apply a coat of terracotta primer. It would fill the small holes or cracks in the lamp and you would require less of the main paint.  I used  Fevycril Terracotta Primer and diluted a little adding water. This primer comes in 1 kg bottle( they didn't have lesser than this, while I was buying).
Let it dry in the sun.


After it has completely dried start painting with your choice of colors.
For the lamps after they are primed, I have used yellow shade of Asian Paint Premium Emulsion Paint for the base color and later for the designs I have used acrylic colors. I didn't want yellow but I had no choice since that was the only one left out from my house painting.


Here for the lantern I have used three shades of Fevicryl Acrylic colors. It looks OK, bit glossy, and I plan to use in my balcony garden, lighting it with a bulb.

Terracotta lanterns


If you are not confident with directly painting, you could draw using color pencil initially(very lightly), as you can see it here.


I have painted these only for decoration purpose and thought it would look cute among lighted diyas. You cannot really find much difference between the lamp and the lantern here in the photos but they do look different in real. The lantern is shining in color while the lamps are not.

Please feel free to suggest or any other tips you have.


Friday, October 28, 2016

Diwali DIY : Bangles Tea Light Holder

It's just a day to go for Deepavali, Indian festival of lights and I haven't done any decoration so far. I am down with heavy cold and severe lower back pain. In between I am busy in cleaning the house for the festival. Searching my crafts stuff I realized, I could do a quick craft for a tea light holder.

It's a tradition in Hindu religion, to gift bangles to the married women along with vermilion. This is something we women cannot refuse. Over years bangles have piled up in my home, some pretty some very dull. Often I donate them to my helper.  For our DIY today, gather some of your old unused bangles, strong adhesive(fevicol), some small golden/pearl decorative buttons/artificial stones.

Bangles Tea Light Holder

Roughly arrange the bangles of same size, and start gluing each one on top of other.

Bangles Tea Light Holder

In between make sure that your tower of bangles is straight and not slanted or in other shape. You can take break in between to make sure that glue has dried properly.

I managed to decorate with the items that I had in my home at the instant. On the top bangles I decorated with the golden buttons, gluing them.

Bangles Tea Light Holder

I used approximately around 15 bangles for one tea light holder.

Bangles Tea Light Holder

Finally place your bangle tower on the card stock, measure from outside and cut it.
Stick it to the base of the tower. This is optional step.

Wasn't this simple? Place the tea light inside and watch the glittering light. Have a happy and safe Diwali.

Bangles Tea Light Holder

Update :
Adding this to Craft Schooling Sunday @ Creative Jewish Mom

Monday, October 24, 2016

Travellogue : Sigiriya Lion Rock Fortress, Sri Lanka

Thanks for your lovely comments on my previous post.
I was vacationing in the beautiful country of Sri Lanka and Thailand earlier of this month.
Our main trip was to Bangkok, Thailand, we had an opportunity to stay for three days in Sri Lanka. It was difficult to choose the places in Sri Lanka, as everything seemed beautiful, important, and we also had to consider distance from Colombo(where we our flight landed). Finally we zeroed on Kandy, Sigiriya and Dambulla caves. Last two are closely located, so you can cover both the places in one day.

Sigiriya
We had booked taxi from Kangaroo Cabs from Colombo from India. As soon as we landed, we hopped on to this taxi and drove to Kandy first.

After exploring the Kandy city, we had a comfortable stay for a night  in OZO Kandy. Kids were so disappointed for our short stay here and didn't want to leave at all. We had heavy breakfast and started to Dambulla Caves at 7:45 AM the next day.

Driving in Sri Lanka is not that tough as roads are well maintained. Unfortunately the driver was very clueless of the roads and routes( forgive us Dilshaan), luckily we had offline google map of Sri Lanka and guided him well all the way.

After a tiring hike at Dambulla Caves, we started to Sigiriya around mid after noon. We were not sure of having lunch and more over there aren't much options for vegetarians like us here. We stopped by a fruit shop and had stomach full of fruits, cucumber and raw mango. I got to taste the dragon fruit which is scarcely available in India.

Although Sigiriya rock was visible from long distance, we had tough time in finding the entrance. Our driver, who while conversing with us in broken English said that last time he visited that place was when he was a kid but he was very confident of finding the entrance. After going round and round, we decided to be wise and asked for the Foreigners entry(there is other options for the locals)

The entry is free for the locals, and we foreigners have to pay a hefty ticket price. But fortunately, there is a discount for the SAARC countries and we ended up paying 2000 SLR for each one of us. You need to also show your passport at the entrance.

It looked very challenging to climb a 200 meters enormous rock on a hot afternoon but don't let it deter you. Most of the people prefer to either morning or late after noon to climb, and it's one of the most visited sites in Sri Lanka. When you enter you will not miss the beautifully landscaped gardens. On climbing further you will come across the boulder gardens and the terraced gardens. There are many little caves here whose walls were once adorned with beautiful frescoes.

Sigiriya

Sigiriya

According to Sri Lankan History, this site was selected by King Kasyapa for his new capital. He built his palace on the top of this rock and decorated its sides with colorful frescoes. You can still see the remains on top of the rock. The capital and the royal palace was abandoned after the king's death. It was used as a Buddhist monastery until the 14th century.
The steps are narrow and you need a lot of energy and water to reach the top.

While you are climbing, just before you reach the Lions Staircase, there is a mirror wall onto your left. Originally, this wall was so highly polished that the king could see himself on it. Now you can see various inscriptions on it, written by visitors both old and new. Few security guards were guarding it, preventing it from further damage.  At the same point you can take few spiral steps upward to see beautiful wall murals/frescoes. Unfortunately we were not allowed to click photos here.

After you have climbed half of the steps, you can see a small plateau, there is a gateway in the form of an enormous lion.
Sigiriya

Further climb is the most challenging part of the climb and the stretch will definitely give you knee pain in the end. We have to carefully climb up a narrow steel stair case on the exposed side of the rock to the summit. You will also  see the grooves carved into the rock surface by the ancient builders to provide the footing for the original staircase that led to the top.

Sigiriya


After the ascent, you can see forests every where around the rock. There were couple of ponds(belonged to the palace) on top which gets full in the rainy season. The usual pictures that we see over the internet are taken in the rainy season where this rocks looks out standing among the greenery that surrounds it. When we visited the ponds were almost dry.

After reaching the summit, and admiring a palace at such a height we stayed there for half an hour, and if you have patience you can go to each and every corner of this palace.

Sigiriya

While we finished the descent, we bought few liters of cold water quench our thirst and refreshed ourselves at the rest room. There are few shops selling the souvenirs but do bargain hard before you decide to buy something.


Sunday, October 2, 2016

Small hand embroidery on Kurta

I love crafting and more than anything else I love hand embroidery. I usually search for tops having some sort of hand embroidery. They are bit expensive and it's justified as it takes effort and time.

Few months back, I had bought  a block printed cotton fabric for getting my self a kurta stitched. I first give a trial piece to stitch before giving anything to any new tailor I want to try. As it happens with most of us, it didn't fit me perfectly. The plain and simplicity of this Kurta made me to try my naive embroidery skills.
I first drew triangles using free hand and a bright colored color pencil. Thus you see no two triangles same ☺ The stitch I used is Herringbone Stitch.

Hand Embroidery on Kurta

Hand Embroidery on Kurta

Hand Embroidery on Kurta

The top had a plain join like thing in the middle which ran till the neck. The filled triangles look more uneven as there was a long time gap in between stitching. It's not perfect but now my kurta looks wearable.

These are couple of cross stitch projects that I did when I was bored during our one year stay in Germany(some 10 years back). I wanted to do something similar. I searched for ready made cross stitch kits on Amazon.in but options were limited and I found it bit expensive. I guess they are imported. I wish my husband was smart enough in these things to get them from his Germany trips.

Cross Stitch

I am planning to start with this Volkswagen cross stitch project. Hope I put my plan to action soon. I am right now in the stage of gathering threads.
Source : Pinterest

So see you soon with another post.


Thursday, September 15, 2016

Welcoming Ganesha

Lord Ganesha is most sought after and worshiped deities in India. He is always been my favorite in real life as well as in my drawings. We celebrate this festival for the sake of celebrating, to keep our traditions alive. I am not doing a very good job of following it, but I want my children to be aware of it, just as I have beautiful memories of Chaturthi. My day never ends without praying the Lord. Of the very few festivals that we celebrate, we try to celebrate this in a traditional way, be it offering Ganesha's favorite sweets, Garike grass or singing Ganesh Bhajan/Shlokas. In the evening it's a visit to a temple, followed by visits to  houses where idols are kept. Most of our neighbors, friends keep Ganesha idols at home, it's also to judge whose idol is best.

In art world Ganesha is the most flexible subject. The elephant head makes him unique and instantly identify the subject. There are thousands of ways of drawing this God. I have tried to incorporate the spirit of the festival into the paper. These are my humble attempts and the originals are more beautiful. Hope Lord Ganesha blesses me to be do more, strive more and achieve what I want, more than anything else find the satisfaction in my work.

First one was done with acrylic colors, and later filling the background with black gel pen.

Ganesha


This Madhubani style Ganesha is found it in my Pinterest board. I experimented with outline this time. Usually I use black marker pens for the outlining, this time I used size 000 brush. I wasn't consistent with the thickness of lines and so you can see. I have used acrylic on handmade paper.
Ganesha

Friday, September 2, 2016

Vividh Bharathi : My all time companion

I am growing old listening to Radio more than watching T.V.  Television was a fad at the time in India while I was growing up and owning a T.V wasn't easy where as Radio reigned in most of the middle class families.
Radio always bring the nostalgic moments of my childhood. My love for radio started when I was in 1st grade, that time it was the only way to keep ourselves updated with current affairs other than newspapers and magazines. How I used to love listening to film songs on radio after lunch break in the afternoons. It was broken few years here and there due to job, studying but it's still one of my favorite activity. No, I don't spend time sitting in front of it but entertains me by playing in the background all the time. For me, be it Sakhi Saheli, Jayamala or Hit Superhit, if it's playing radio it has to be Vividh Bharthi channel.
Vividh Bharthi because it still plays decades old songs, less nonsense,less talking, literally no commercials. The programs are informative, entertaining and soothing to your mind.


Vividh Bharathi

Remember Jayamala program played for the soldiers on fronts?You get to listen tips, thoughts, recipes for many women on Sakhi Saheli programs in the afternoon along with melodious songs.
While Aaj ke Fankar is about any personalities from Indian Film Industry, Man Chahe Geet in the afternoons is for requesting songs. I am swept away when sometimes my favorite Kishore Da song is played and as a result I hum along.

Many time my kids felt overwhelmed when my requested song was played announcing my name. 😁 I know it's silly but they find it great.

Understanding my affinity for radio my husband bought a small portable/ plug gable radio for me from his visit abroad and it's become an enviable among my relatives. We do sometimes have heated argument when my husband changes the channel by rotating the delicate knob. I do remind him of my ownership.

So my readers, do you listen too to Vivid Bharathi like me? Or you find it out of date?

Friday, August 12, 2016

DIY : Paper rolled pens

The other day my gel pen got over while doodling something and I was in urgent need of the black gel pen.The nearest store fellow tried to sell me couple of new branded pens as he did not stock pen refills. I inquired in few other ordinary shops and to my surprise none of them had refills. When the cost of refill and the pen are almost the same, people would more likely to buy new pens rather than buying a refill. Ever thought what would happen to your old pen? You would either hoard it, throw it or if you are eco conscious and old fashioned like me, you would put a new refill. I have seen many people around me buying new pens on a whim. Finally I got my pen refill at a stationary shop.
I remembered seeing these paper pens in few craft stalls that I frequented in the past. I decided to make these pens at home, try and use it myself. These are cute and you don't have to feel guilty when the ink is over.

Paper pens
Things you need.
Pen refill, Paper. The thickness of the pen depends on the thickness of paper. If you are using newspaper strip, you need a long one as they are thin. I used the paper bag's paper which was slightly thick.
Glue, scissors, ruler, pencil/sketch pens.

Cut out a rectangular shaped paper whose height is that of the pen refill(width is approximately 30 cm).

Draw a slanting line from the top left corner, to the right side like shown below. This is for tapering of the pen, to get cone shaped tip for the pen. Cut the paper along the line.


Lay the pen on the left edge and firmly glue the refill onto the paper initially. This step is the only tricky step and if you do it correctly then your rolling would come out perfect.


Start rolling and apply glue at the end of the roll.


To make the cap, take a rectangular strip(height less than half length of the pen, width less than half of what you had taken for the pen).


The diameter of the cap is slightly more than the pen. Take the pen and start rolling the strip to the other end of the pen. Do not roll tightly and you should be able to remove the pen in the end.

Apply glue to one end of the rolled cap and press it hard to close it. Let it dry.


My pen was simple but you could finish it with a strip of nice gift wrapping paper to make it attractive.


Please note that this may not be appropriate for students who have heavy writing work but more suitable for casual use.


Wednesday, August 3, 2016

Travellogue : Trip to Nathula Pass

The trip to Sikkim is incomplete without visiting the Nathula Pass on the Indo- Tibetian border in East Sikkim. We visited in the first week of April 2015, the time where we get to enjoy snow and pleasant weather( so this post is there in my drafts folder for over an year, -:))
Nathula Pass is located about 14,000 ft above sea level and come rain, sun,snow or avalanche, its guarded by the brave soldiers of Indian Army.

Permission to visit Nathula Pass
The road to Nathula is only open during specific times of the year and you need special permission to visit this and Tsomgo lake(which on the Nathula-Gangtok road) from the Indian Army. The permissions are available in the Tourist Office in M.G. Marg, Gangtok and visiting time for Nathula are strictly  limited,you have to return to Gangtok before 3-30 PM the same day.
Our permits Nathula were organized by Sonam Delek, where we stayed during our trip and the charges were included in the fare. We were lucky to get this permission as the heavy downpour previous days had made the road less traversable. We were highly impressed by Sonam Delek to go that extra mile for not only arranging us the permission but also providing us an excellent taxi driver.
For the permission you need the passport size photo and Id proof. This was informed earlier to us so we had taken along with us while leaving for Gangtok. I don't remember the exact charge but it was around 5000 Indian Rupees for one vehicle.

Sikkim, Nathula Pass


Sikkim, Nathula Pass


Since we got the permission late in the morning our journey to Nathula from Gangtok started a bit late and we were in a great hurry to return back too. On the way to Nathula, you will encounter beautiful, small waterfalls, do stop by while returning from Nathula Pass.
En route to Nathula is breathtaking and at the same time scary one. The time we went the roads were not in good shape. On one side it's misty deep valley and other side it's snow clad mountains with boulders and stones. Thanks to Indian Army for maintaining them all year around.

Changu Market
In case you are not prepared and do not have warm clothes for the shivering weather,  you can rent them at the small shops near Changu Lake(Tsomgo lake). There are many shops to rent jackets, snow boots, gloves. Take care to try it out thoroughly before renting. We were in a hurry and the jacket we got for my younger son didn't have buttons so he wasn't covered properly. That was a concern in the whole trip and he was freezing when he was outside the jeep. Besides renting the jacket and snow boots we purchased gloves for memory sake.

Sikkim, Nathula Pass


Silk Route
While on the way to Nathula Pass you can see the Silk Route which really exists!!!. This is one such route which connects Tibet with India where trading of Tea, Chinese silk, Indian Jewelry are done. It was closed due to hostility between China and India, it was reopened after 44 years in 2006. While our visiting the trading hadn't started. We also passed through the Sherathang village which is inhibited by the army officers, security, customs officers and we were ecstatic to see State Bank of India branch serving the people at such heights.
Once we reach on the top, in Nathula, we have to park the vehicle outside in designated parking and walk onto the top where actual border is seen. It is tedious and you may fall sick due to lack of oxygen. The sun was shining and to see the border of India we didn't mind the height nor the discomfort. The Indian soldiers guarding here insists on not to click  any photos. Our tryst with Nathula was worth as we got to salute and shake warm hands of Indian soldiers and the Chinese on the other side of the fence. In the end it was so cold, we wanted to go to loo badly but off course there were none there. There is a small café 14K at those heights,frozen after few minutes in cold outside we thawed inside having memorable hot soup.

Descending from Nathula Pass, we visited the Tsogmo lake nestled among the snowy mountains . It was so spectacular sight and beautiful beyond words. The water in the lake is due to the melting of the snow in the surrounding mountains. Here you can take yak rides around the lake or simply click photos sitting on brightly adorned yaks. We did the latter one.

There are plenty of places where you can park the vehicle besides the road and play in the snow.After a while when chilly winds hit you, you respect the soldiers again for bearing such cold to guard the country. The cold outside was making my younger son fussy and we just walked few steps in the snow and returned back to the Jeep.
Sikkim, Nathula Pass

On the way back we stopped briefly at New Baba Mandir in the memory of the soldier Harbhajan Singh. There are many stories and legends about him protecting the Indian Army. You can click beautiful pictures of serene Himalayas here in the background.

Sikkim, Nathula Pass

Sikkim, Nathula Pass

Shopping
Every trip is incomplete without the souvenir. Do not forget to shop at the souvenir shop run by army near New Baba Mandir where I felt the prices were reasonable. It is bit crowded but definitely they will tend to your needs.

If you still have time you might give a visit the original Baba Mandir but we gave it a skip(The taxi driver mentioned about this but due to time limit we could not visit this place)


Monday, July 25, 2016

Styling your Coffee Table

If there is one thing I love to do most with my home then it is decorating my coffee table.
Coffee table is an focal point that is looked upon as soon as someone enters your living room.  There are n number of ways to experiment with it looks and here are few of my favorites approaches.

Creating a vignette
The main idea of creating vignette is to create a mood with the still life objects and color co-coordinating these objects. Its simple, take a large tray and arrange few things of your likes like Buddha, vase, sea shells, boxes, jewelry, green plant, planters, candles etc.,  in it. Coffee table and the vignettes tell you about your tastes, likes and gives the personal touch to the living room. I keep changing these vignettes, some times its all brass wares, vase with fresh flowers, idols or sometimes just some shells and flowers in the pickle jars. I personally like to go for the natural trays like bamboo, or the grass,rattan trays that we get in the craft and handicrafts exhibitions in India.


Coffee table book
Coffee table is incomplete without the books and you should display books if you have a large table. Many large, heavy books are available exclusively to be displayed on the coffee table. This could show your interests in the books and become a conversational topic among your guests. I sometimes put magazines on the table.

Table runner
Deck up your table with an elegant table runner that matches the overall décor of the room. Remember it should go well with your sofa upholstery and the color of your walls. There are so many options available both online as well as many home decor shops offline. Fun part is that you can keep changing them according to your vignette and have throws/cushions to match them. If you like to stitch and embroider, put up your hand embroidered, or an applique work on display.

Flower Vases/Small planters
Choose a flower vase depending on the size of the room and the table. Fresh flowers are always welcoming but in case you are short of time to buy fresh flowers, choose artificial ones with best imitation. A short or a flat flower vase if you are keeping with other things.If you have green thumb then choose some succulent in attractive planters.


Here are two ways in which I have styled my coffee table.

My Coffee Table


Having said all the above things do not clutter your table. Keep it simple and well arranged.


Wednesday, July 13, 2016

Small tour of my garden

When it comes to garden I am very much greedy. I want to grow every possible plant in the small space that we have. But its difficult due to reasons like --
We visit our native with family at least thrice a year days ranging from four days to two weeks. In our absence taking care of plants is done by a helper for whom I am always grateful. When we return, we find some plants would have died unknowingly.

In spite of this I have kept few pots in the balcony and around the house, before going out of station, I have bring down all pots from balcony, pots kept indoors for watering in our absence.

My garden is looking neat now, the secret is that we laid new grass. It not only adds green color but gives a sense of completeness. I am not sure how long would this picture lasts as soon, we face the termite problem.


Thanks to the Facebook group 'Organic Terrace Gardening' I have decided to take gardening seriously. I have been procrastinating the vegetable gardening all this while because of
* Monkey,rat menace
* Requires daily care and maintenance, pest controlling.
But there are so many people around us who have made a point to grow their own veggies. If it's possible for them, it should be possible for me too, moreover I have more time now than earlier.

I have grown few veggies outside my home. I just started with fenugreek seeds it was going well. But yesterday morning when I see it is attacked by the rat.

The star of my garden is the White Butterfly Ginger Lily. You can smell it even from inside the house. I bought this tuber from my mothers place and always remind me of the rainy childhood days where  these flowers used to adorn our hair.

white butterfly ginger lily

The rain has made few new buds to come up in Red Ixora plant

Red Ixora

I love Milkweed plant, as the name suggests its mostly grows like a weed bearing most vibrant flowers. I often cut them and put it into small vases.
milkweed

My Purple Heart plant is growing in hanging pot.

Purple Heart

There were/are lots of  Pomegranate flowers, small fruits but we didn't get any fruits to eat this year, everything went to the monkeys. 

Pomegranate

Hope you have enjoyed my mini garden tour. Coming up next is the coffee table decor. Have a nice day folks!!!