Wednesday, September 27, 2017

Bombe Habba of Navaratri

It's the festive season here in India. Dussera or Navratri is one which is celebrated all over India, many states celebrating in a different way for nine days, the tenth day being Vijaya Dashami. In south it's the Gombe(dolls) Habba or Bommai Kolu(Golu), which is displaying various dolls in a systematic fashion. This tradition is popular in the southern states of Andhra, Tamilnadu and Karnataka.


These dolls are kept on the first day of Navaratri beginning with Ganapathi pooja followed by Kalasha Pooja. The female deities Laxmi, Parvati and Saraswati are also kept in front of the rack of dolls.
Laxmi idol
These wooden planks or racks are odd numbered and at times dolls are displayed randomly or  they would be arranged according to themes from the Indian epics like Ramayana.

Scenes from Ramayana
\
Dashavathara of Vishnu, Kondapalli Wooden Toys.

The Procession

Sri Ranganatha
Most of the dolls are made from clay but people also keep hand made dolls, POP dolls and also wooden dolls.

Basic plastic doll decorated depicting the Brahopadesham to a son by father
One common doll that we find in the display is the 'Pattada Bombe' or 'Marapachhi'. This is the husband and wife dolls that are gifted to the daughter by the parents during her wedding. These dolls are usually dressed as the bride and the groom and find the center place in the display. It symbolizes the beginning of daughter's collection of dolls, and continuing the tradition of Gombe Habba.
Pattada Bombe or Marapacchi
Each evening of the nine days there would be offering(Naivaidya) to the God.

During the evening there is house hopping among the children and the women folk to view the dolls. Many places there would be awards for the best display. The ladies of the community come together for the Arashina Kumkuma where host lady invites other women offering vermilion, sweets, gifts them.
At the end of Navaratri, that is the tenth day, the God is thanked and worshiped for the successful completion of the festival.  All the dolls are wrapped up carefully for the next year.
This year I got to see many display and it's a visual, colorful treat. One house where I was invited was mind blowing. She has a whole room dedicated to dolls and created various scenes from Ramayana, few mythological scenes.

Linking this interesting story to Our World Tuesday

Monday, September 18, 2017

News Paper Tube Owls

Hello people..

I have been collecting owls from wherever it's affordable and worthy.  I also found some simple fabric owls and paper owls images online. Thought to try them once.


Here is a tutorial on how to make cute owls from the newspaper rolls.

First thing you need to prepare the news paper rolls. You need few of them and take the best ones. In spite of doing newspaper rolls, I am still not achieved that perfection yet. Many which I make are not the same from top to bottom.

I always find helpful in flattening them first, make a rough roll and then use it.


You need to make a fair roll of at least diameter of 9 cm. Apply generous amount of glue on both sides of the base body of the owl.  Meanwhile prepare two rolls of diameter 4 cm for the eyes.

Coloring is optional. I don't like a thick acrylic layer on the owl, so I used the thin coat of acrylic on the base. I love the effect of newspaper print and colors.


If you are planning to make a hanging then put sufficient length of thread from the middle hole and tie it at the rim.

After everything has dried, colored, attach the eyes to the base body,on top.
For the head, a made a thin strip of roll which can be flexible. It can be easily bent and can be attached on a top of the eyes.


I also made a branch at the base.

You can make few of them and make a Garland or use it the way I have used.
I have put few glass beads and hung them on an indoor plant and one on the knob of the door.


Tuesday, August 1, 2017

A DIY simple glass painting

It's always a crafter's dilemma as which craft to do first. I am also one such case who is shifting between one craft to another, abandoning the thing in between. I had bought a pack of glass colors with a plan to color the glass bottle, obtaining a  tinted  bottle. I abandoned this after not getting the expected results. After a few months again I bought a pack, this time of another brand, left it unused for many days.  Few days back I saw my relative using the glass colors to make a beautiful glass painting. I got so inspired from her and try a simple one on my own. So here a simplest way in which you can use the glass colors.


Glass Paint

I took two drinking plain glasses.
Cleaned it first and let it dry.

Glass Paint

I took Camel glass colors, Water based, which comes in a pack of six colors and a black liner.
Drew the desired design using the glass pencil. This is optional. If you are confident enough, you could do free hand directly with the liner.

Glass Paint


With the liner that comes with the pack, drew lines, on already sketched design. I drew multiple diamonds around the curved surface of the glass.  Let it dry completely for about an hour.
I filled in these diamonds with the desired colors, one diamond at a time. The liner acts as a boundary and will not let the color spill to the next cell.

Glass Paint


Since it was a curved surface, I had to fill each one and wait till it dried completely.While drying it again I had to lay it flat. Since glass colors run crazily, it would get concentrated at one place, look plain in some places. Its OK for the first time and its OK because making the paint stay on a curved place is not easy. But in spite of all these minor glitches the finished piece looked cute.

Glass Paint

I used my terrace space for drying. It was sunny and was good for my project. This way the paint dried quickly and I could fill in each color quickly.

Glass Paint

This is how it looks in the night

Glass Paint


Tuesday, July 18, 2017

A stroll through Shuka Vana, Mysore

If you are looking for a weekend getaway from Bangalore, Mysore is one of the place most of us choose. There are lot of things to do in Mysore which is calm, peaceful and pensioners paradise. Last weekend we visited sister in law place in Mysore. Kids were demanding trip to either the Zoo or Palace. Having seen them many times, we definitely weren't in a mood to go there. While contemplating a new place to visit, we decided to go to to Avadhoota Datta Peetam situated on the foothillls of Chamundi Hills.

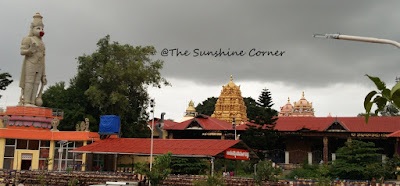
The Avadoota Datta Peetam or Sri Ganapathi Sachchidananda Ashrama , as it is popularly known, is not any typical ashrama. The Ashrama, spread over a few acres, houses a Bonsai garden, lots of beautiful sculptures, a massive bird cage, a temple, prayer hall, vintage cars, a park, large Hanuman Statue and many more. Founded by His Holiness Sri Ganapathy Sachchidananda Swamiji, Avadhoota Datta Peetham is a world-renowned institution for the social, moral, cultural and spiritual welfare of mankind.
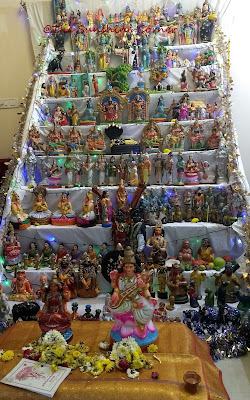
You need at least a day, if you want to explore the whole of Ashram. Our visit was worth, since it caters to everyone's desires. It has a museum for museum lovers(which we skipped due to priorities  and time), Shuka Vana, a bird aviary  and a Bonsai garden for garden lovers. Apart from these it also has large statue of Lord Hanuman, Nada Peetham and Dattatreya Temple for the spirituals.


The Shukha Vana bird aviary encompasses more than 568 species of birds mainly parrots, macaws, horn bills etc most of them from the tropical countries either rescued or bought.  Entry is free to the Shuka Vana. Apart from beautiful birds, another major attraction of this aviary is feeding the birds at a nominal cost and getting clicked with them. I wouldn't recommend the taking photos with Macaws as it is slightly overpriced and the staff are rude. The use of mobile phones is strictly prohibited inside the aviary. The birds are enclosed in cages which is well maintained and taken care of. At the end of the day, I think a few of them are let free in an enclosure. Some of the cockatoos are very adept at mimicking what you say and it was so fun. My son was busy talking with it, seeing it talking back all of us were talking it with, and finally it got confused whom to mimic.


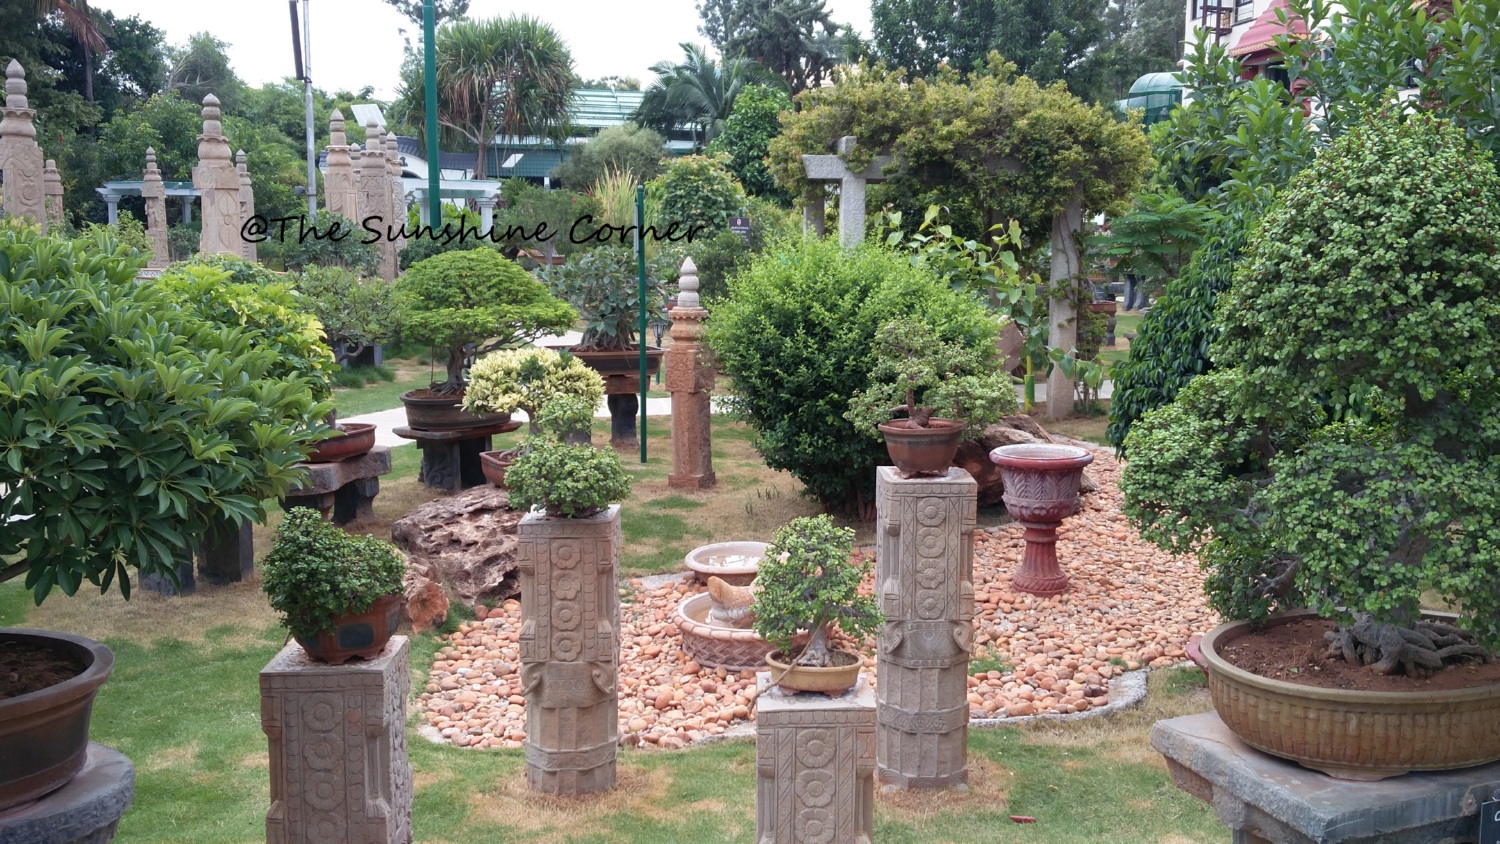
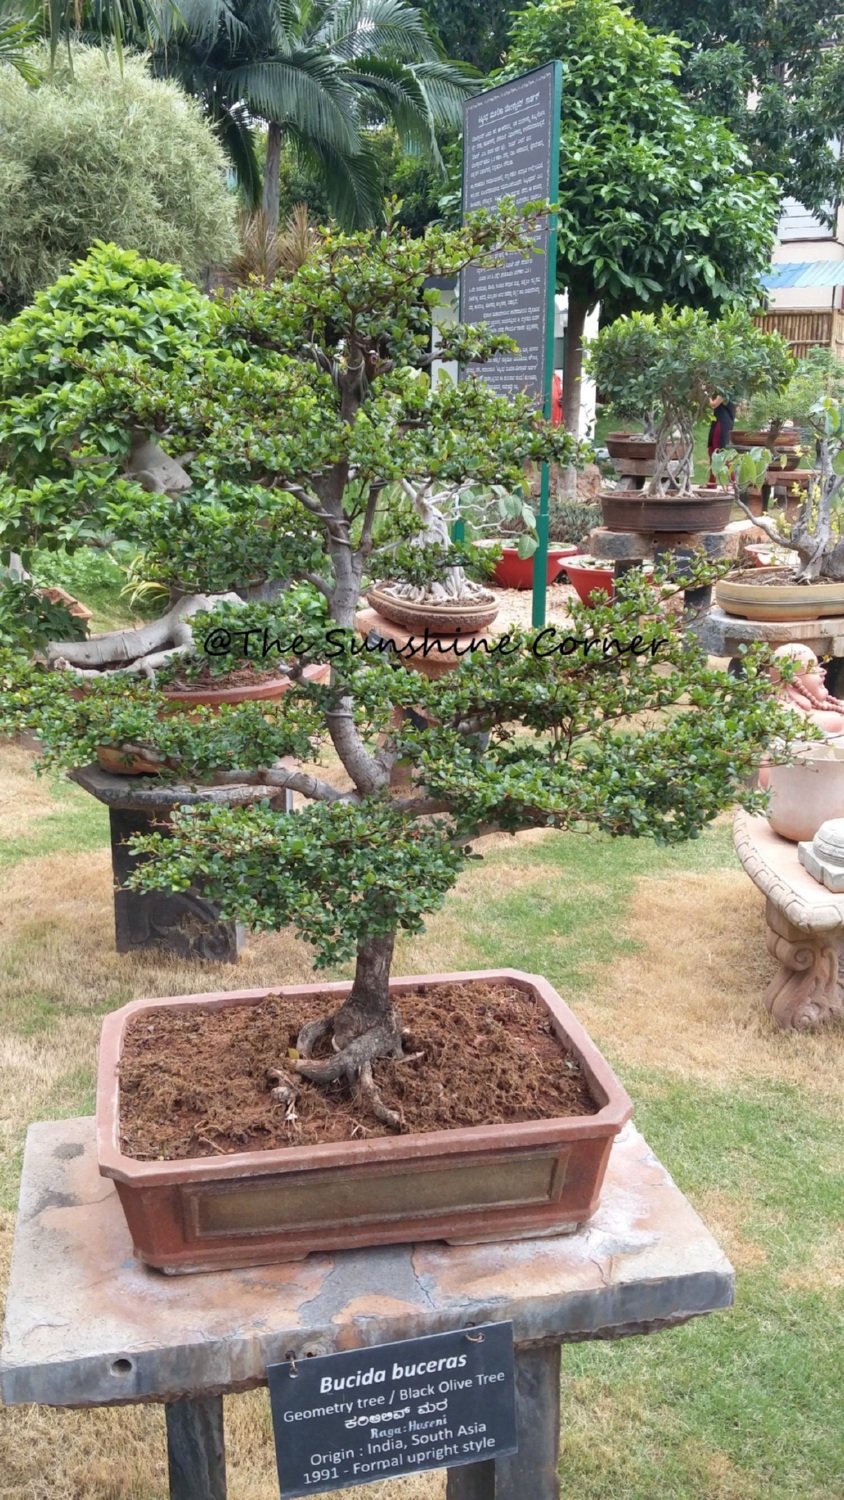
The jewel in the crown was the Kishkinda Moolika Bonsai garden. The entry to Bonsai Garden costs you rs 20, and its just awesome and very well maintained. Here you can see lots of Bonsai, one for each day of the year. Also these Bonsai's are kept with the name of the raaga. I have never been to Bonsai garden before and I was left stunned and thoroughly impressed by this collection.


Both Shuka Vana and the Bonsai garden are the award winning projects of Swamiji.
If you plan to stay or visit Mysore, Karnataka, don't forget to add this in your Must Visit list.


Thursday, June 22, 2017

Decor with dry flowers, pods

Living close to nature has been a boon to us. My morning walk is never complete without observing the minute details of the nature. There are lots of trees near our house which bear beautiful flowers. These flowers make their way to my home, as well as their dried version. Here are some ways in which I have incorporated them into my home decor.
Sandpaper vine is most beautiful while in bloom, but dried version is also glorious. I picked up an entire dried twig. Isn't it looking gorgeous? These flowers in an abstract vase and with yellow background looks good in my home.

Decor with dry flowers

The pods of "Pride of India" which are beautiful in their own way. I get different ones each time, half closed, closed and fully open ones. These are brown ones which goes well with any kind of vase either plain ones or designed ones.


Decor with dry flowers


These were few dried wild pumpkin that I picked up on our home from a road trip. They were plain and I could not resist the idea of doodling on them. In this vignette you can also see the pods, the ever blooming dried flower famous in Ooty, India and also some pine cones that we purchased in Ooty.

Decor with dry flowers

If it's India you are sure to spot the May flower or Gulmohar as they are popularly called.While their flowers are irresistible, their pods are also good item for testing your painting skills. Besides making a simple tea light holder from this, these are popular in my home for the fake sword fighting among my kids.


Decor with dry flowers


Some wild grass that I picked up on a day of hot summer. Note that these were already dried due to summer heat and I didn't have to put any effort in drying them.

Decor with dry flowers

And finally, my favorite vignette at home on the coffee table. I randomly put some twigs in tinted glass jars.

Decor with dry flowers

So next time if you come across something like these, be sure to pick them. Turn them to affordable decor piece.

Wednesday, June 7, 2017

"Kaavi Kale", traditional art of Konkan

Kaavi art

India is a land of traditions and art. There are so many folk, traditional art forms which are still alive, specific to a particular region and being practiced. There are also few art forms which is struggling to find their place either due to lack of patronage or due to lack of people to carry forward the tradition. Once such art which was once popular and slowly declining is the 'Kaavi Kale' of the Konkan Region of India.
'Kaavi Kale' famous in the Konkan areas mainly in Goa, South Canara(Coastal Karnataka) and few parts of coastal Maharashtra. 'Kaavi' is the reddish brown pigment obtained from the laterite soil and 'Kale' means art. The ingredients for this art is abundant in the coastal regions and hence this art finds presence in the Konkan. This is the only color used in these murals and forms a fine example for the monochrome art.
This form of art is said to be originated in Goa and the Saraswats spread them to other regions in the Konkan.
A mixture of burnt snow white lime, river bed sand, jaggery is made initially and left to ferment for two weeks. This mixture is hand pounded to make it smooth, later mixed with Kaavi and smeared on the walls. The desired design is etched on this layer and its smoothened by river pebbles. Water is is sprayed frequently for couple of days while this layer is hardened(It may sound simple but one needs to be expert in etching as well as good in Material Science).
The main features in this art are the deities, floral motifs, and characters from the epics like Ramayana, and Mahabharata. Most of the time the engraving depends on the main deity of the temple.
These murals look outstanding on the white walls and there is no doubt you will be left impressed by their beauty. Sadly in the name of modernization, the Kaavi work is on the verge of getting extinct.


Kaavi art
On the outer walls of Udupi Shri Krishna Temple

Kaavi art
Besides the main entrance(Mukhya Dwara)  of a small temple in Chempi, Udupi


Kaavi Art
Marikamba Temple, Sirsi, Karnataka

Kaavi art
Outside Kaniyoor Math, Udupi, Karnataka

Kaavi art

Friday, May 5, 2017

Works in April

Hello there..
I have been totally away from the blog land. Lot of issues like health, kids exams and then vacation etc. I was present here but my mind inactive for a while. The soaring heat even in the Garden City like Bangalore has added to the list of issues. So here are few things I did in the past month..

I completed a Madhubani painting. This painting had few empty white space, and in the end I messed up by adding more leaves in black color.  I am owl fan and I always wanted to paint owl in Madhubani and this is achieved. I am soon going to try new one as I am not satisfied.


I completed two small level embroideries. These were just to fill the void in the ready kurthas that I bought. I know you would say there is nothing great here,  and I agree to that 😊. Only thing is that the tops have become more wearable like.


What is fascinating nowadays in the silk thread jewelry. Recently I just happened to attend a small party in one of our neighbors and that lady had called her friend who was into Silk Thread jewelry. I saw them and thought I could also try them at home. So for the start up, I just completed a couple of them. I kept them very simple without any embellishments.


So what's happening at your end? Thanks for visiting...

Monday, March 27, 2017

Recycled bottle with dot painting

Thanks for your lovely comments on my previous post, Weekly Market(Santhe)

I have been experimenting with Batik Design Technique on fabric for a long time, I have been successful to get the desired result in few,  and few of them were totally disastrous and unexpected. To take break from that, and to cheer myself I am exploring other crafts which are in my To-Do list.

There are few wine bottles that I have been hoarding for a long time to get them painted.  My first thought was to try dot painting with acrylics on the bottle. Before doing that, I tried dot painting with Fevicryl Liquid embroidery tubes. These are actually used for doing liquid embroidery on fabric but I have used to paint my bottle with them.

Recycled Wine Bottle with dot painting, Fevicryl 3D outliner


I got few limited colors in the shop, and the shop was selling more metallic colors. I bought orange, blue, yellow. I was looking for white color but I got pearly white which I thought was OK and still doable. Before I got started I had to remove the labels from the bottle.

How to remove the labels from bottle
There are methods to remove the labels which many swear by but this following process has most of the time worked for me.
Initially soak the bottle in hot water(not boiling) for about an hour. If the label has any paper part, it would come off with scrubbing.
To take off the tough, sticky glue, apply some oil and baking soda on the sticky label. Leave it for a while(about 10 min). Take a scrubber and scrub the label off. This should get you a sparkling bottle.

How to paint
Fevicryl 3D outliner
I have used the fine tipped pen to draw my designs on the bottle. I didn't go about drawing the entire design initially instead drew only what was necessary. . I just drew step by step, as my design demanded it.  Keep a wet cloth handy, because if you do not like what you have drawn, you can immediately wipe it.
Start with slowly squeezing the bottle. You would get tiny dots, which looks like tiny spikes.

Fevicryl 3D outliner

I tried first on the plain glass bottle, free hand without any particular design in mind. I am happy how both have turned out. Best way show them off is to have golden pothos in them.

Linking this post to Craft Schooling Sunday by Creative Jewish Mom